Value of Parts on Hand Is Now Shown On Library Screen

We’ve just pushed out a system update today. It’s primarily a maintenance release, but one new feature has also been added in. It’s the display of dollar value for parts that you currently have in stock and on order.

This information is presented in two ways:

  • On a per-part basis via two newly added columns — Value on Hand and Value on Order:Value of Parts On Hand And On Order
  • Total values shown in the footer:Value of Parts On Hand And On Order -- Footer

We hope you’ll find this useful.

Other Changes in Release 1.3.2

  • Search via Octopart now takes into account any unsaved changes you may have in the Edit Window when starting the search.
  • Improved automatic matching of Excel column names and Parts-in-Place fields during import.
  • Fixed a visual glitch with displaying dropdown menus during Excel import in Firefox on Mac.
  • When sorting tables by Company P/Ns that contain a mix of numbers and letters, a more natural (hopefully) sorting order is now used.

What We Are Up To:

Tracking Alternative/Replacement/Interchangeable Parts

This is one area that we’re working on right now. The approach that we’re taking is using a hierarchical structure for part-related data in the library: the Company P/N with Description and a few other “general” fields would reference one or more “manufacturers’ parts” (supposedly equivalent from the electronic designer’s perspective), each of which would in turn reference one or more offers from suppliers, with supplier-specific part numbers and prices.

Downloadable Version of the System for Installation On Your Own Private Server

Almost immediately following the launch, we started seeing requests from users wanting to host the Parts-in-Place system locally within their organizations’ networks, and these requests keep coming. Well, after some initial resistance, we’ve now warmed up to this idea and are working to offer to those interested a downloadable version of the Parts-in-Place tool.

It will still be a web-based solution, not a desktop application, yet you’ll be able to install and host it on your own private server, behind your firewall.

Just to be clear, the downloadable version of Parts-in-Place is in no way intended to replace the on-demand, cloud version in our business model.

We estimate that approximately 20% of our customers would prefer to host the inventory system on their own premises, while the other 80% prefer the cloud system. So, our intention is to offer you a choice of the two variants so that you can pick the solution that best suits your requirements.
Compare Bills of Materials and See the Differences with Just a Few Clicks

Have you ever needed to compare two revisions of a BOM? How do you usually do that? My guess is that you do one of the following: 1) open two Excel windows side-by-side and go down the rows, visually comparing the two files, 2) print out both files and then go over them, checking the rows with a ruler, or 3) convert the Excel files over to .doc format and then use MS Word’s Compare and Merge feature.

I’ve done this too. And because it’s so unpleasant, I’ve always put this task off as long as possible.

But now that’s all a thing of the past. As of today, Parts-in-Place offers a quick and easy way to compare Bills of Materials and immediately see the differences between them. Here is how it works:

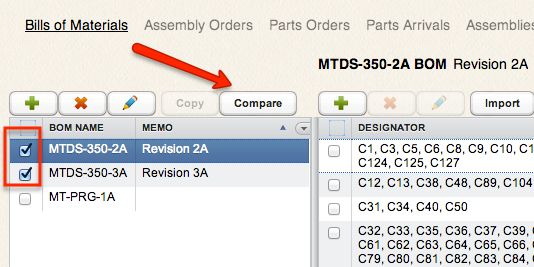
Select any two BOMs that you want to compare on the Bills of Materials screen and then click “Compare.”

Select and Compare Bills of Materials

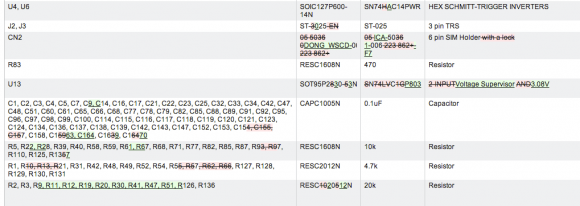
In response, the system will open up a pop-up window with a formatted diff of the two BOMs. It looks like this:

Formatted Diff of Two BOMs

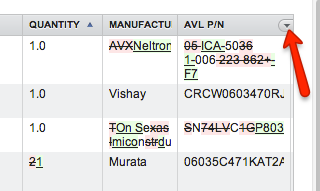
Only those rows with differences are shown, and the columns that have no differences in any of the rows are also hidden. You can unhide the columns as usual by clicking on the small arrow in the upper right corner of the table.

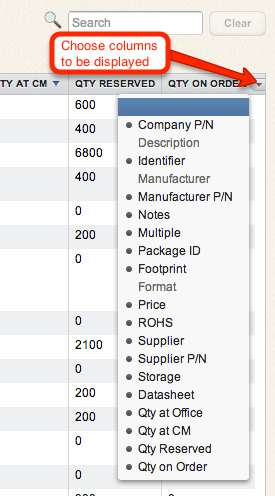
Use Menu to Control Which Columns Are To Be Displayed

Which of the two BOMs is considered the baseline for the comparison is determined by the Memo field. The two BOMs are sorted by their Memo fields, and the sort result determines the order of the comparison. For example, you can set the first BOM’s Memo to “1” and the second Memo to “2” and this will result in the BOM with Memo “1” being the baseline.

As with any Parts-in-Place table, you can sort the comparison results table by any column by clicking on the column header.

This past Sunday we rolled out the compare BOMs feature as part of Release 1.3.0. Give it a try and we’d love to hear how it works for you.

Other Changes in Release 1.3.0

  • There’s now a “User Settings” menu, allowing you to choose which actions should require an explicit confirmation before proceeding (such as deleting an item).
  • The textual captions of the Add and Delete buttons have been replaced with icons and an Edit button has been added (let us know whether you find this change helpful!).
  • The edit window now opens automatically whenever a new item is added to a table.
  • Redesigned the table footers.
  • Fixed an issue where inviting multiple users at the same time would fail with an “internal error.”

Integration with Octopart: a Search Engine for Electronic Parts

Search and find any of 18 million unique electronic components, verify their market status, and save links to datasheets in your Parts-in-Place library.

Parts-in-Place 1.2.0 went live this week, bringing a new feature and several improvements as well as bug-fixes. The new feature is integration with Octopart, and this is something we are truly excited about.

Now you can search for parts in an online database featuring 18 million unique electronic components, which is linked in real-time to over 100 distributors. For each part you can see an assessment of its market status — GOOD, WARNING, or BAD — depending on how many offers for that part are available from distributors, as well as the part’s description and a link to the datasheet.

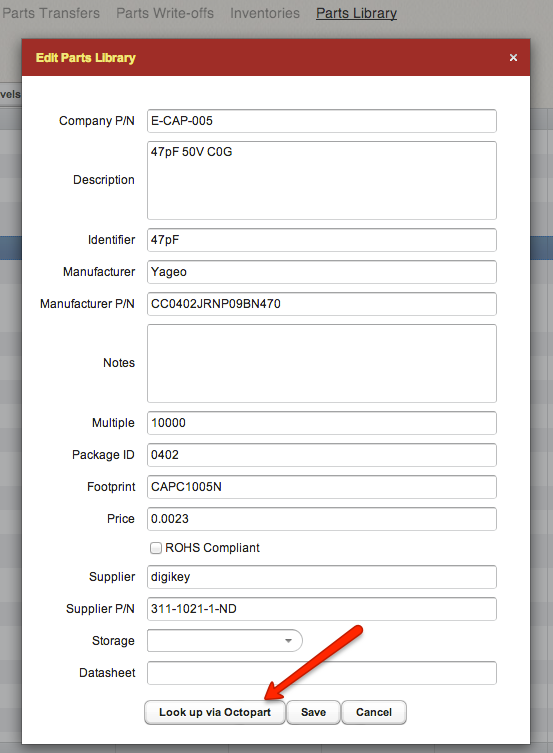
You can do this search and view the results right from the Library screen in Parts-in-Place. To do this, simply click on the “Look up via Octopart” button inside the edit window.

Look up via Octopart

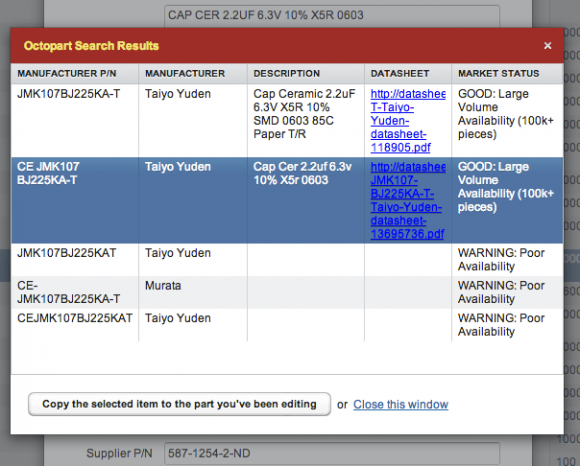
This is will open up a search results window similar to the following:

Octopart Search Results

In this window, you can select a part and click “Copy the selected item to the part you’ve been editing.” This will result in the part’s description and the datasheet link being copied to the library part that you have opened for editing. You can then either Save the changes or discard them by clicking Cancel.

This is only the beginning of what can be done as far as integration with Octopart goes. Technically, we can also pull pricing information and we can look at searching for multiple parts at the same time, e.g. to match your entire BOM to orderable parts via the Octopart engine. as to what you personally would like to see in this direction.

Other Changes in Release 1.2.0

Show or Hide Columns

  • Table settings, such as column widths, shown/hidden properties, as well their relative positions (did you know that you can re-order columns via drag & drop?) are now saved across user sessions and re-logins.
  • When exporting data to Excel, now all columns are always included. Previously, only visible columns were exported, while hidden columns were not. (Did you know that you can choose which table columns are visible by clicking on the small arrow in the upper right corner of the tables?)
  • The special meaning of the DNI identifier (DO NOT INSTALL) is expanded to apply to any identifier of the form “DNX” where X is any letter. This is to cover DNP (DO NOT PUT), DNF (DO NOT FIT), or any other abbreviation that we may be not explicitly familiar with. We are betting that you will not use any “DNX” identifiers for a purpose other than to mark a certain component as not to be installed.
  • A “Copy” button is now on the Bills of Materials and Parts Library screens, and this allows you to create copies of BOMs and parts in the library for subsequent editing.
  • The AVL P/N field has been renamed to Manufacturer P/N.
  • A few bugs that are too embarrassing to list one by one are now fixed.

How MOQ Numbers Are Used When Generating Parts Orders

You’ve probably heard that Parts-in-Place takes into account the Multiple Order Quantity (MOQ) settings for parts when calculating the quantities to purchase. There are some nuances in how this calculation works, so let me explain it a bit more.

First of all, the MOQ values are treated in Parts-in-Place as the Multiple Order Quantities, not simply Minimal. This means that the system will try to round the order quantities up to the nearest multiple of MOQ. More specifically, here is how it works:

The MOQ values are set in the Parts Library, in the Multiple field.

MOQ values are set on the Parts Library screen

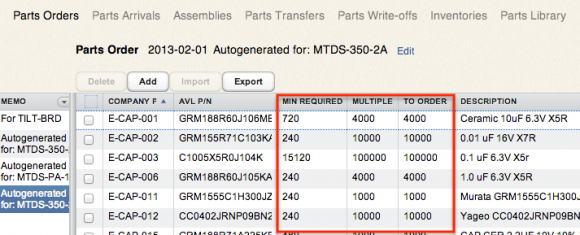
The Parts Order document has three quantity-related columns:

  • Min Required
  • Multiple
  • To Order

Parts Orders Have Three Quantity Fields

When you instruct Parts-in-Place to generate a Parts Order for your upcoming builds, the system will fill in those quantity columns as follows:

  1. The Min Required quantities will be calculated to satisfy the needs of your planned builds, taking into account your current inventory on hand.
  2. The Multiple values are just copied “as is” from the Parts Library.
  3. The To Order is set based on the following rule:
    • If the Multiple is a numeric value, the To Order is rounded up based on the Multiple and the Mininimum Required.
    • If the program is unable to interpret the Multiple value as numeric, the Qty To Order is set to match the Minimum Required, and in addition the text “Verify Multiple” is added to the Notes field on the Parts Order, which causes this particular table row to be highlighted in yellow.

If the MOQ setting is not numeric, the system will highlight that item

Generally, whenever the program finds the word “verify” in the Notes field, it will highlight that row, so you can use this feature to highlight any item for your convenience.

So, the important things to remember about the MOQ setting are these:

  • The value is set on the Parts Library screen, individually for each part.
  • You may leave the MOQ field blank, in which case it will not be used for that particular part.
  • If you specify a numeric MOQ value, it will be used when generating lists of parts to order: the calculated minimum required quantities will be rounded up to the nearest MOQ multiple.
  • If the system finds the MOQ setting for a component to be non-numeric, it will be ignored in the calculation, and the text “Verify Multiple” will be added to the Notes field, and that item on the Parts Order will be highlighted.

How Parts-in-Place Calculates Stock Levels

When calculating the current stock level for a component, as required when planning upcoming builds, Parts-in-Place will first look up the latest Inventory document listing that particular part number. If an Inventory document with the required part is found, the system will use the quantity on that document as a reference point. If no inventory document listing the part is found, the calculation will start off with zero quantity.

Then the system will analyze the other documents (Parts Arrivals, Assemblies, Parts Write-offs) with effective dates later than the most recent inventory document listing the part in question. The system will basically “play back” the operations described by those documents, adjusting the calculated quantity in stock at each step.

Here’s an example. For the sake of simplicity, let’s consider a single component with the part number “P1”. Let’s assume the following documents have been entered into the system:

  • Inventory 1, dated 2012-06-24. The quantity of P1 on this Inventory is 1000.
  • Inventory 2, dated 2012-08-31. The quantity of P1 on this Inventory is 4000.
  • Parts Arrival 1, dated 2012-07-28. The quantity of P1 on this Parts Arrival is 500.
  • Parts Arrival 2, dated 2012-09-14. The quantity of P1 on this Parts Arrival is 2000.
  • Assembly 1, dated 2012-07-01. The quantity per unit of P1 on this Assembly is 25, and the number of units assembled is 200.
  • Assembly 2, dated 2012-09-10. The quantity per unit of P1 on this Assembly is 25, and the number of units assembled is 100.

Now, let’s assume that Parts-in-Place needs calculate the quantity of P1 in stock as of 2012-09-15. Here is what the system will do:

  1. It will look up the latest inventory document listing P1. In our example this will be the Inventory 2.
  2. Then, it will look for Parts Arrivals, Assemblies, and Parts Write-offs with the effective dates later than the date of the latest inventory found on step 1 above. In this example, the date on the latest inventory containing P1 is 2012-08-31, and so the system will then examine the Parts Arrival 2 and Assembly 2.
  3. The system will “play back” the operations described by those documents, adjusting the calculated quantity at each step:
    • 2012-08-31. Based on the Inventory document, the quantity of P1 in stock is 4000.
    • 2012-09-10. According to the Assembly document, 2500 pcs of P1 were used for a build. The remaining quantity in stock is 1500.
    • 2012-09-14. According to the Parts Arrival document, 2000 pcs of P1 were received. As a result, the quantity of this part in stock rose to 3500.

So, in this example, Parts-in-Place will calculate the quantity of P1 in stock as of 2012-09-15 to be 3500.

Notice how the system simply ignored the Assembly 1 and Parts Arrival 1 documents in this scenario. There was no need to consider them, because there was an Inventory document from a later date listing the part that we were interested in.